Windows Home Server Release Candidate (RC) is here

Windows Home Server RC1 is here. The build number is 06.00.1424.2 and it is available to existing beta testers at http://connect.microsoft.com/WindowsHomeServer/Downloads/DownloadDetails.aspx?DownloadID=6920 . As well as bug fixes it includes a better setup process, new remote access capabilities and auto router-setup for UPnP 2.0 home routers.

If you are not part of the WHS beta put would like to be, you may fill out the survey to be part of the testing group for RC1 at http://connect.microsoft.com/WindowsHomeServer/ . PC system requirements are a system with at least a 1-GHz, Pentium III-class processor, 512MB RAM, 80GB hard drive, and a network interface card.

Have WHS shown correctly in your Windows Vista Network Map

LLTD Before

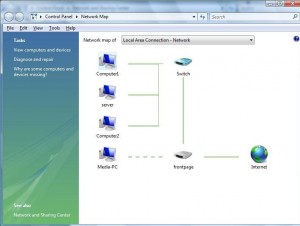
Windows Vista Network Map before the LLTD Responder install.

Those of you using Windows Vista can now have your WHS shown correctly in your Vista Network Map by having the LLTD Responder for Windows XP installed on your WHS machine.
Download the LLTD Responder for XP from Microsoft’s website.

Run the exe on your WHS system (32bits only).

Ignore the Setup Error that it will not install on your version of windows and do NOT press the “ok” button of the error message but leave the message present as it is.

Search the root of your drives for a folder which should look something like:
“a64f92cd628ff82fa309fa2d8204f0” Mine was in the root of the D drive.
In this folder you will see the extracted files of the setup.

Copy the contents of the folder to a temp folder of your choice, except for the  $shtdwn$.req, as it is in use by the setup.

After you copied the files you can click the “OK” on the error message and the setup folder disappears.

Go to your temp folder where you copied the files.

In the update folder go to update.exe properties.

On the compatibility tab choose windows XP.

Run update.exe and the LLTD services will install.

We now need to go the properties of your network card via Start, Control Panel, Network Connections, Local Area Connection and click on Properties.

On the “General” tab choose Install.

Select “Protocol” and “Add”.

On the list you now choose “Have Disk”.

Browse to the folder where you copied the files and go to the \SP2GDR\ip\ folder.

Select the “inf” file, click OK and you’ll see the LLTD.

Press OK and you will see it listed as “Link-Layer Topology Discovery Responder” in the list.

You will now need to restart the WHS machine.

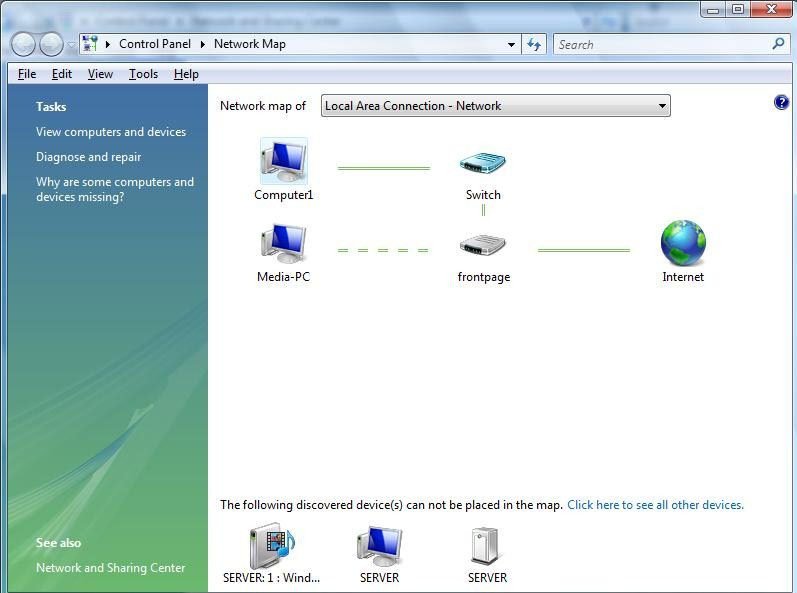
Under the Network and Sharing Center, “View full map” in Windows Vista you can see that the WHS is now fully listed.

LLTD After

Windows Vista Network Map after the LLTD Responder install.

How do I View the WHS log files?

You can view the WHS log files from a remote desktop connection (under Start->Accessories) to the server or from the web interface if you have done what was discussed here to get the full Home Server desktop and not just the console.  Make sure that you logon as Administrator with your WHS password. Then go to the event viewer via All Programs, Administrative Tools then Event Viewer. 

Whiist – Website Management Add-In for Windows Home Server

Andrew Grant has made a free Windows Home Server Add-In that allows management of websites and links on your home server. Once installed Whiist adds Website Management options to your Windows Home Server Console, allowing you to easily create new links or websites in a few simple steps.

It Features:

  • Create new websites on your home server in a few simple steps.
  • Create pages for all the family, or separate pages for individual users.
  • Easily customize your public and private Windows Home Server Homepage links.
  • Fully integrated with the Windows Home Server management console.

More information and the download link is available at Andrew Grant’s website.

UPDATE: Andrew has added a great How-To How to create a Windows Home Server photo album.

ERROR The terminal server has exceeded the maximum number of allowed connections

Terminal Server Error Message

When a user establishes a Remote Desktop connection to the WHS this connection will remain active until the user selects “Log Off” from the Start Menu. If a user simply closes the remote desktop window when they’re finished, that username will still remain logged on.

The software running on the WHS to facilitate the Remote Desktop connection will only allow for up to two simultaneous sessions. Active and disconnected sessions are calculated in this connection limit as is the Administrator account also. The console session, however, does not count against the connection limit.

If a third attempt is made to login to the server, the dreaded “The terminal server has exceeded the maximum number of allowed connections” error will be shown to the user, and they will be unable to complete the login process. You can’t even connect to disconnect the old sessions BUT there is a way around this:

Simply click OK to the error message and wait for unto 30 seconds for the window to close then simply type the following in a Start – RUN or CMD Prompt on your client machine.

mstsc /v:00.00.00.00 /f -console
 
Replace 00.00.00.00 with your server’s IP Address or server name. e.g.SERVER

Type in your administrator password. This will then connect you to the Console Session on the server and allow you to remote control the machine again.

Once in Click Start, point to All Programs, point to Administrative Tools, and then  click Terminal Services Manager.

In the left hand column you should see your server name. Click on it once. Note the Users Tab in the right pane.

You should see a list of users. You need to reset the two “Disconnected” users. You can do this by right clicking the disconnected user and selecting “Reset.” You should now be able to connect with RDP again after Start – Log Off.

When logging in under this special Console session always kill the inactive sessions first, because if you get disconnected again you will have to connect your monitor, keyboard and mouse.

Only use this session to terminate the other two sessions and not for any other use.

In future when you are done with a Remote Desktop session on WHS, you should always use “Log Off” rather than disconnecting by closing the RD window with the X as this will disconnect from the session but leave it active.

P.S. You could also use the easy option and just reboot the Windows Home Server.

Remote Web Access

When accessing the Server after logging into the web interface (”Remote Access to Windows Home Server Console”, then “Connect to your Home Server”), you only get the Windows Home Server Console, and not the full Home Server Desktop. The good news is that this can be easily changed.

On the server, open C:\Inetpub\Remote\rdpload.aspx in Notepad and locate the following two lines:

MsRdpClient.SecuredSettings.StartProgram = "HomeServerConsole.exe -b"; (this is on one line)

and

MsRdpClient.SecuredSettings.WorkDir = "<%= WorkDir %>";

These tell the browser based RDP session to use HomeServerConsole.exe as the “shell”, with a command line parameter to tell it not to show the Minimize and Exit buttons.
 
Replace the two lines, above, with the following two lines:
 
MsRdpClient.SecuredSettings.StartProgram = "Explorer.exe";

and

MsRdpClient.SecuredSettings.WorkDir = "c:\\Windows";
 
This tells the RDP session to use explorer.exe as the “Shell”, which it normally is anyway.

Now, when you access your Windows Home Server using the web interface, you’ll see the standard Desktop inside your browser window.

livenode.com up and running again

The scheduled upgrade has been completed and the dynamic dns service for Windows Home Server is back up and running.  You can sign up for domains under livenode.com and access your home server via the livenode.com URLs again.

livenode.com down

Windows Live Custom Domain service will be down for server webstore upgrade on Tuesday 6 June at 11:00am PST. 

The Dynamic DNS Web services as well as the DNS service itself for all Home Server beta customers will be unavailable during this deployment change.  Remote access to machines via their livenode.com domain names will not be available during this time.

The service downtime is expected to last several hours or longer.  

Using WHS as a print server

Connect your printers to WHS itself.  By doing this, your other connected client PCs will be able to print if you’re “main” PC is off or inaccessible.  That is one of the benefits of installing your printers onto WHS, using it as a print server.

If WHS does not find the driver automatically try downloading Server 2003 drivers from your printer manufacture website as this is what WHS is based on. You may also try XP drivers in compatibility mode. Right click the executable, Select Properties, Select Compatibility, Select “Run this program in compatibility mode for” and Select Windows XP from the drop-down.

If this still does not work see if your printer manufacturer offers a trimmed-down basic driver as HP does for my HP DeskJet 990cxi printer.

If your driver came as an exe file you can also try to extract the inf files by using WinRAR. Right click the exe file, WinRAR then Extract. If no Extract option appears your final option is to use an exe extractor utility like Universal Extractor which will try to extract files from any type of archive allowing you to use device manager to locate and install the driver from the inf files.

Make sure WHS is assigning itself to the proper workgroup. Is it WORKGROUP, MSHOME or something else? Make you’re your server and clients match.

When installing a multi-function printer (MFD) on a server the only function supported is printing as the drivers for scanning/faxing will NOT work.

N.B. If you are using Windows Vista be aware that when you come to add your network printer drivers to your client machine that User Access Control (UAC) must be set to the default enabled. Otherwise the following error message appears “The specified print monitor is unknown”. This happens when the machine try’s to automatically install the printer drivers. With UAC disabled the printer drivers cannot be installed from the server.

To re-enable UAC, go to Control Panel Classic View, User Accounts and click on “Turn User Account Control on or off”. Make sure that “Use user Account Control (UAC) to help protect your computer” is ticked.

UPDATE: The following site has links to find drivers for almost any printer on the web.

UPDATE 2: 1) If your driver has an exe extension and none of the above works, then you can run the install program and the files will be extracted to the temp folder of your user profile. So go through the setup routine clinking next and keep looking within the folder above. The files should be in there own sub folder in that folder, but not always.

2) If you have a vista system that gives you an error about “being out of memory” when you try to add the printer there is a simple trick to fix this.  you will need to download the vista driver for the printer (duh) and install the printer as a local printer and simply select LPT1.  once the printer has been installed go into the properties and manually change the port to \\servername\printername\ from LPT1.  then you should be set.
TIP Courtesy of masteroffm from The Green Button Forums.

Good Evening, Afternoon or Morning – Wherever you are

Hi,

Welcome to a new site dedicated to Windows Home Server. The home server for dummies (like me). Finally we have  a server product for Mr or Mrs’s average.

Over the coming days, weeks, months, years (OK We get the picture!!!) this site will fill with detailed information, articles, tutorials and relevant news about WHS.

In the meantime have a read “About” me.

Enjoy, learn and have fun – A Server for the People !!!