Interview with WHS Product Manager Charlie Kindel

As reported on We Got Served. Windows Home Server Product Unit Manager (PUM) Charlie Kindel is interviewed by Scott Hanselman on many aspects regarding WHS. So sit back, relax put your feet up and listen to this educational half hour podcast.

You may find out more about Charlie Kindel from his site cek.log.

Is there a Problem with your Security Certificate?

If you are using a computer without the connector (console) software on it (e.g. at work trying to access your home server) and you try to connect to the web interface of WHS then the following error appears:

error

Home PCs with the connector/console software installed have the server’s certificate automatically installed during connector setup. Computers without the software installed don’t have this certificate and so the error message.

To stop this error appearing; when accessing the web interface we need to export the certificate from a PC with the connector/console software on it and then import it into the PC without the software on it.

EXPORT

  1. So on the PC with the connector/console software on it open your web browser and type in your https://xxxx.livenode.com address
  2. To the right of the address bar click on the Padlock icon and then View certificates
  3. Click the Certification Path tab
  4. Double click the long GUID number (root certificate)
  5. Click the Details tab
  6. Click the Copy to File… button
  7. Export the certificate somewhere safe using default option

IMPORT

  1. Move the certificate to the machine without the connector/console software
  2. Double click the the .cer file and select Install Certificate… on the General tab
  3. Click Next on the wizard that opens and place a dot in Place all certificates in the following store
  4. Click Browse and select Trusted Root Certification Authorities and click OK
  5. Click Next and then Finish

That’s it. You can now access your web interface on your PC without the connector/console software via your livenode.com dynamic address, your server name e.g. SERVER or localhost without getting the dreaded error html page.

Independence Day

Happy Fourth of July to our United States folk on Independence Day. Time to have a day off from our Windows Home Server…Probably!… Have a wonderful day this July Fourth.

image

New Anti Virus for WHS from Avast

Terry Walsh from We Got Served has posted details regarding a WHS anti virus product from Avast. It will cost $39.96 – $50 which is a lot cheaper than their server offering and will be available later this year.

P.S. Welcome home Terry from the States!

More Online Offsite Backup Solutions for WHS

Following my write up on different online offsite backup providers it was bought to my attention that although IDrive-E offers unlimited backup their pricing page states

The concept of ‘Unlimited Storage’ is to facilitate a low one-price plan to backup a PC’s critical data that meets requirement for majority of consumers; there may be some limits based on what constitutes fair usage. Please see Conditions of Use.

And their Conditions of Use state

…..this limit from storage point is currently fixed at 150GB and subject to changes.

I do wish that when company’s state unlimited that they do mean unlimited and not “unlimited up to 150GB” Sad. Apart from this I am sure that an upper limit of 150GB may be fine for some but not for me.

After a quick browse through my hard drives I figure that I must have in access of 250GB that needs backing up, perhaps you have more or perhaps you only have 5 or 10GB that you want stored offsite. So OK, what is the solution.

Well, here are some recommended online backup providers listed by the amount of data that you require to be backed up:

  • For up to 25GB of storage I would use MediaMax FREE alongside Proxure KeepVault add-in for WHS. And as the package name suggests it is free.
  • IDrive-E Pro for Personal Use allows unlimited storage space for your backups. Although their use of “unlimited” is 150GB. So for backing up 26GB-150GB I would use them @ $4.95 per month.
  • For backing up 151GB-250GB I would use the MediaMax Elite service along side Proxure KeepVault add-in for WHS @ $9.95 per month.
  • And for backing up 251GB-1000GB MediaMax again along side Proxure KeepVault add-in for WHS @ $29.95 per month.

NOTE: For the MediaMax/Proxure KeepVault products you only need to download the Proxure KeepVault add-in for WHS as the signup to MediaMax is included in the add-in itself and upgrades from the FREE 25GB storage to a higher plan (up to 250GB or up to 1000GB) can be performed from within the add-in also.

How many hard drives are there in your Home Server?

Tom from Ramblings of a Home Server Tester has posted a server storage screen shot from one of his server PCs

storage

WOW over 6GB of storage space!!!

Now can you do any better…I wonder?

How To Install uTorrent on Windows Home Server

I used to use my PC to download torrent files whilst sleeping, but since my PCs are now turned off overnight and Windows Home Server is on 24/7 it seemed logical to install uTorrent onto WHS. The other advantage of installing it on the server was that if more than one of us in the house was using uTorrent it would not cause a lot of traffic on the connection and most importantly by the time you finish this tutorial it will also run without a logged-in user.

Create the New User

First of all we need to create a new user on the server. This is done for security reasons as we do not want to install uTorrent under the default Administrator account. Once this step is completed you may continue with the following.

Install and Configure

Connect via the Remote Desktop Connection as the user you have just created e.g. “WHS” and your newly created password.

Download the Windows Server 2003 Resource Kit Tools and install rktools.exe using the default options.

Next install the µTorrent 1.6.1 Installation Program using the default options.

If this is the first time you have installed uTorrent on your server then a dialogue will appear asking if you want to associate .torrent files with µTorrent. Click Yes. If a Windows Security Alert pops up asking if you want to Block or Unblock uTorrent Click Unblock and if the Speed Guide appears set your Connection Type and the Current Port that you would like to use.

You will now need to forward the port you selected above into your router. Details of router setup screens can be found at http://www.portforward.com/english/routers/port_forwarding/routerindex.htm (select your router and then uTorrent)

In uTorrent select Options then Preferences. Make sure your General screen matches this one:

General-utorrent

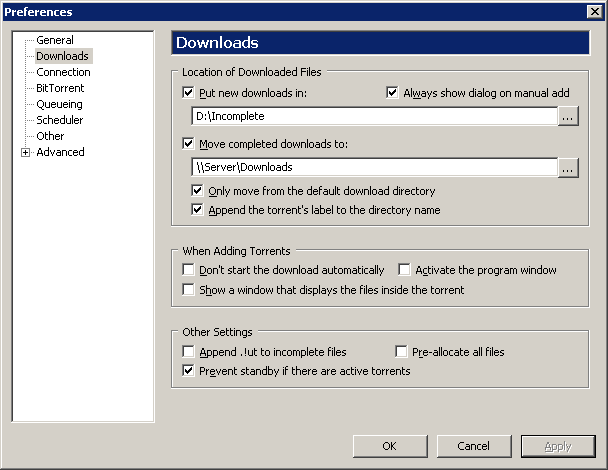
Make sure that your download screen matches the one below. You can change the location for your Put new downloads in but do NOT use a server share. It has to be under a drive letter on the WHS otherwise the Drive Extender Migrator Service will cause data corruption errors as it tries to move the file onto another drive while uTorrent is in the middle of writing to it, or just before uTorrent tries to open the file to write to it again. The Move completed downloads to can be changed to any server share location.

Downloads-utorrent

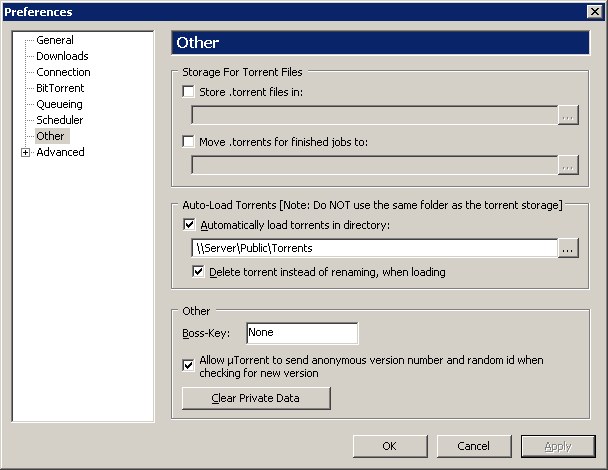
The other screen should match this one. Once again the Automatic load torrents in directory location can be changed to any server share location. This setup enables uTorrent to monitor this specific folder for .torrent files and start downloading them automatically. All you have to do to start a download is place the .torrent file in that folder and uTorrent will do its stuff.

Other-utorrent

Using the Scheduler tab you can set your downloads to occur during “off-peak” periods by setting up a schedule if you so require.

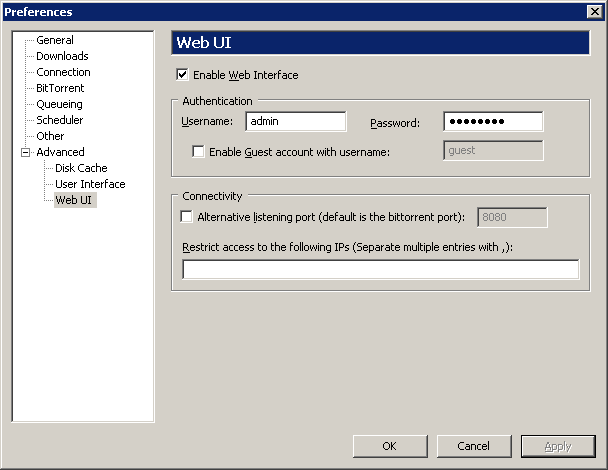
As below, under Advanced Web UI Enable Web Interface and configure a Username and secure Password of your choice.

webui-utorrent

Click the OK button and close uTorrent.

Next Download the uTorrent WebUI and extract webui.zip from the rar archive.

Click Start then Run and type %AppData%\uTorrent. Place the webui.zip into this opened folder (do NOT unzip it).

Next download the uTorrent add-in for the Windows Home Server Console from here or here. Do NOT run it but place it in your Add-Ins Shared Folder (\\SERVER\Software\Add-Ins). Log In to your WHS console and go to Settings, Add-ins the Available tab and then click Install under “Windows Home Server – uTorrent”.

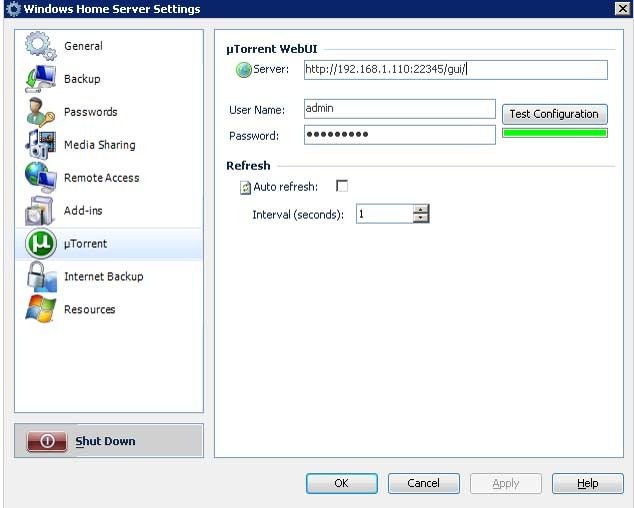
Once the console re-starts log back in to the console and go to Settings, uTorrent and for Server type in http://YourIP:Port/gui/ e.g. http://192.168.1.110:22345/gui/
YourIP is your server name or IP address and Port is the uTorrent Port that you set up earlier.

settings

Next insert your User Name and Password as set up earlier. You can press Test Configuration to check all is OK. Red is not and green is fine. You may now OK out of the Settings and close the Console.

Create the User-Defined Service

From your Windows Home Server click Start then Run and type cmd. In the window that opens type the following which is all on one line, including the quotation marks.


"c:\Program Files\Windows Resource Kits\Tools\instsrv.exe" uTorrent "c:\Program Files\Windows Resource Kits\Tools\srvany.exe"

NOTE: Cut and paste will not work, instead highlight and copy the above line and then right-click in the open CMD window and select paste.


Press Enter on your keyboard. Once the screen displays The service was successfully added! you may close the cmd box.

We need to now create a .Reg file using notepad and paste in the 3 lines of code below.


Windows Registry Editor Version 5.00  

[HKEY_LOCAL_MACHINE\SYSTEM\CurrentControlSet\Services\uTorrent\Parameters]
"Application"="C:\\Program Files\\utorrent\\utorrent.exe"


When saving make sure that Save as type is set to All Files *.* and save as service.reg. Double click on this saved file to import the settings into the registry on your server.

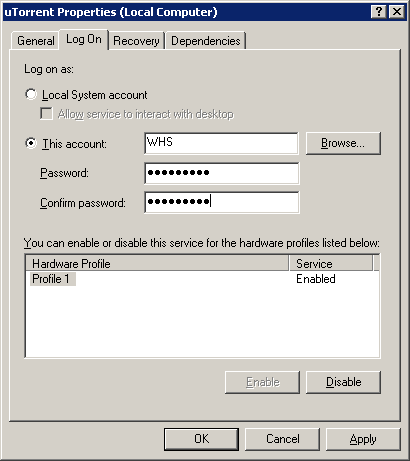
Now click the Start button and then select All Programs, Administrative Tools  and then Services. Find uTorrent right-click and select Properties.

Select the Log On tab. Click the This account button and enter WHS as the This account and enter the Password you setup earlier for this user account and confirm the Password.     

logon-utorrent

OK out and close the Services dialog.

Click Start, Shut Down then Restart.

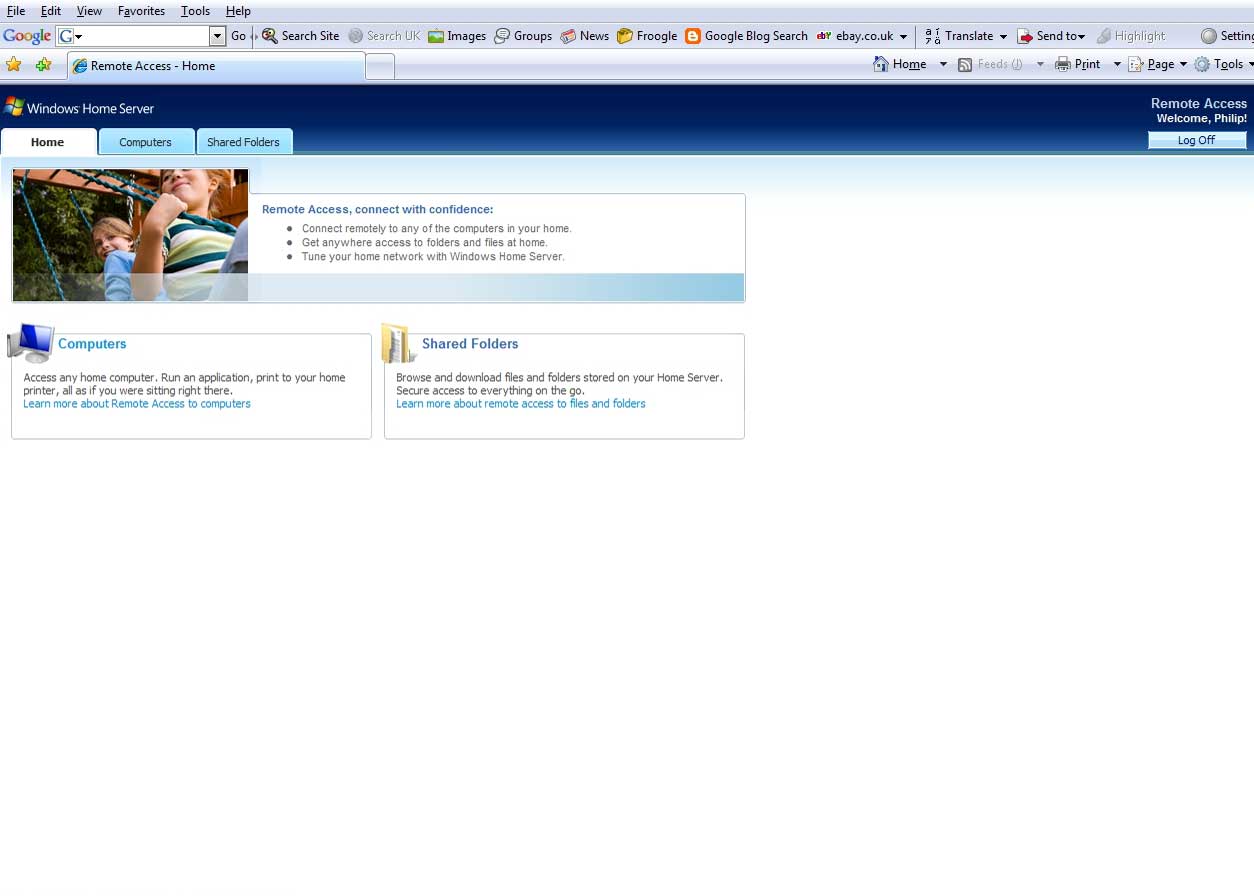
That’s it job completed. You can now connect to uTorrent either via the web interface using your browser using the format http://YourIP:Port/gui/ or via the WHS console (uTorrent heading).

All you have to do to start a torrent download automatically is place the .torrent file in the \\SERVER\Public\Torrents folder and forget about it.


P.S. Whose of you with Windows Vista may like to know that there is a sidebar gadget called µTorrent Stats that enables you to Start, pause or stop any torrent and allows you to view the stats and files for each torrent separately, all from the desktop sidebar within Vista.

Add-In: OnTheFlyUnzipper – Automatic Unzipper

Imagine this scenario. You are at a friend’s house and you want to upload 25 files from his PC to your WHS using the upload feature from the Shared Folders tab within the web interface. Now if you have tried this you will know that it takes forever, but no longer.

The latest news from the German Ms Homeserver Blog is that using OnTheFlyUnzipper will allow you to add hundreds of files in a ZIP or RAR archive, upload this file to your Windows Home Server and the add-in will then automatically uncompress the files. Saving you time, bandwidth and of course megabytes within your upload.

Other options or functions include:

  • unzip only archives with a special prefix in the filename (if you don’t want to unzip every archive)
  • delete the archive after uncompressing
  • create a folder for the contents of the archive
  • select the shares that should be monitored for archives
  • runs as a service

Well done to developer Alex (AliG) for this add-in and apart from the download a PDF User guide is also available.

Your input – We need more!!!

Apart from helping with topics that you’d like to see covered in Woody Leonhard forth coming Windows Home Server for Dummies book. Andrew Edney has been in contact also. His book Windows Home Server User’s Guide is due to be published in october 2007 and he as well, would welcome your comments for ideas on what to include.

So thinking caps on and leave your comments for Windows Home Server User’s Guide right here under this post and continue to leave comments for Windows Home Server for Dummies here.

What Ports do I forward in my Router for WHS?

Some of you have emailed asking which ports you need to forward on your router for Windows Home Server. So here we go:

The first port to forward to your WHS is the “standard web traffic” (HTTP) port 80, although this is optional. If you don’t forward it, you can access your WHS machine using https://<address> instead of http://<address>

Next is the “secure http web traffic” (HTTPS) port 443.

Then Remote Web Workplace (RWW) which uses port 4125. This enables you to access the web interface feature.

Web Interface Web Interface Feature

Finally the Remote Desktop Protocol (RDP) port 3389. This allows you to use “Remote Desktop Connection” to connect to your Windows Home Server desktop.

RDP Windows Home Server Desktop

All ports are TCP only – UDP is NOT necessary.