Windows Home Server Toolkit – The User Manual
In this post we hope to give you the information you need to get the most from Microsoft’s Windows Home Server Toolkit, a tool and an add-in with many advanced features. It’s important to note that the Toolkit will not make any changes to your computer, it will point out where the problem(s) lie so you can make the necessary changes yourself.
Firstly we need to download the latest version of the Windows Home Server Toolkit from http://go.microsoft.com/fwlink/?LinkId=98872. Once downloaded , and before installing, make sure that you remove any previous versions of the toolkit, as an upgrade will not work. Run the downloaded WHSToolkit.msi on your home PC (NOT the server) to install. Once installed, the components of the Toolkit can be located in the Windows Home Server Toolkit folder in the start menu, where you will find the following:
- Connector Troubleshooter
- Error Reporting
- readme.htm
Error Reporting is a command line utility which collects diagnostic logs regarding WHS, compresses them and sends them as a cab file to Microsoft for analyses. Take note of the cab file number (e.g. WER5054.tmp.cab) as it will be the only way to identify yourself as the sender of the file in case you need to contact Microsoft.
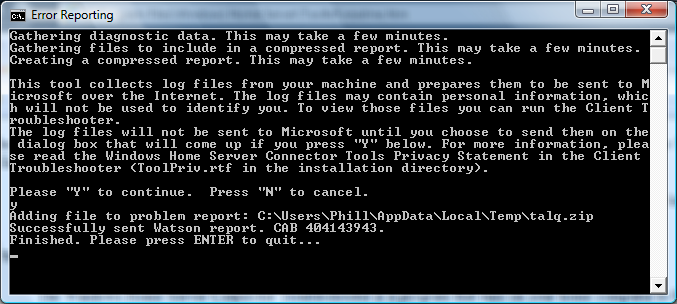
These log files maybe also useful to other support professionals when they are troubleshooting issues with Windows Home Server. In this case you can stop the cab file from being sent to Microsoft by pressing N when prompted and view the generated talq.zip file yourself or send it to the person providing support for you. This file is approximately 30MB in size and is located in the following location alongside the cab file (if sent):
- Vista: C:\Users\[UserName]\AppData\Local\Temp
- XP: C:\Documents and Settings\[UserName]\AppData\Local\Temp
A good log file within this zip archive to start troubleshooting from is talq.log
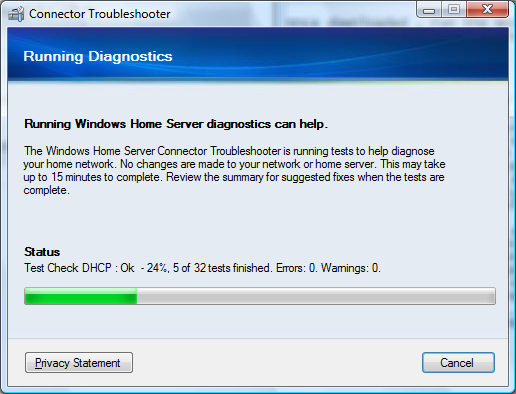
Connector Troubleshooter is a program that runs on your home computer to help you troubleshoot problems with installing the Connector software. In it’s default user friendly “simple mode” it runs a series of tests to check the most common Connector Setup problems, and recommends possible solutions. It does say that it can take up to 15 minutes to complete, but in reality it only takes a minute or two.
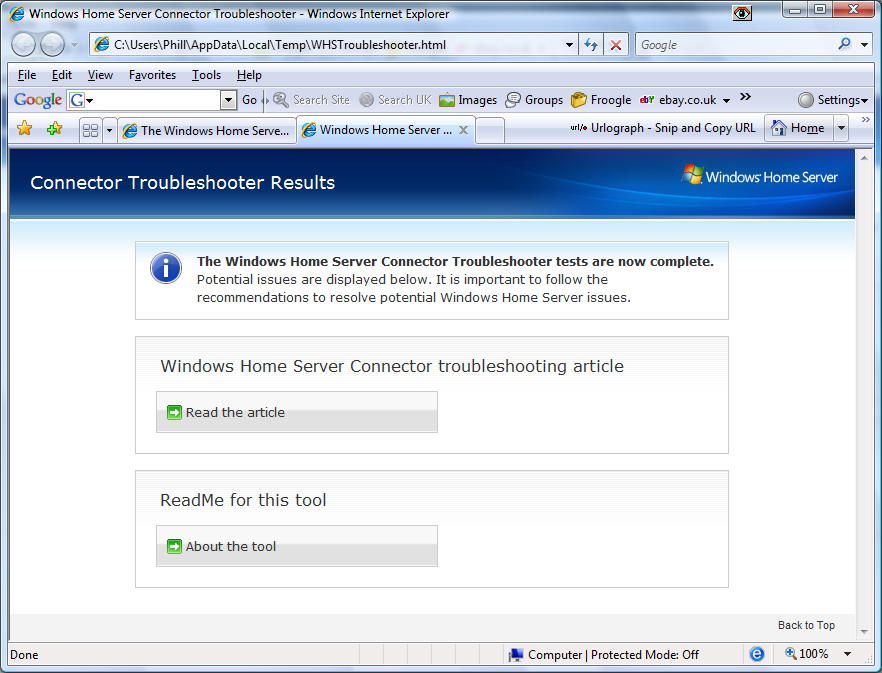
Once complete the program will close and a web page will open displaying a summery of the results. It also provides suggestions to help you successfully install and configure the Connector software.
The Connector Troubleshooter can also be run in advanced mode where more functionality from the Troubleshooter is available. Follow these steps to start the Troubleshooter in advanced mode:
- In Windows Vista, Click Start, run and then type cmd in the open text box. In Windows XP, Click Start, run and then type cmd in the open text box.
A command-prompt window opens. - At the command prompt, type “cd %ProgramFiles%\Windows Home Server\Toolkit” (without the quotation marks) to change the current directory.
- Type ConnectorTroubleshooter.exe -a to start the Troubleshooter in advanced mode.
The Advanced Connector Troubleshooter will take a few seconds to find all of your connected server’s. as you can see the screen is divided into 3 panes. The left pane shows the progress of each test. The top right pane shows the results of the current test and the log is shown bottom right.
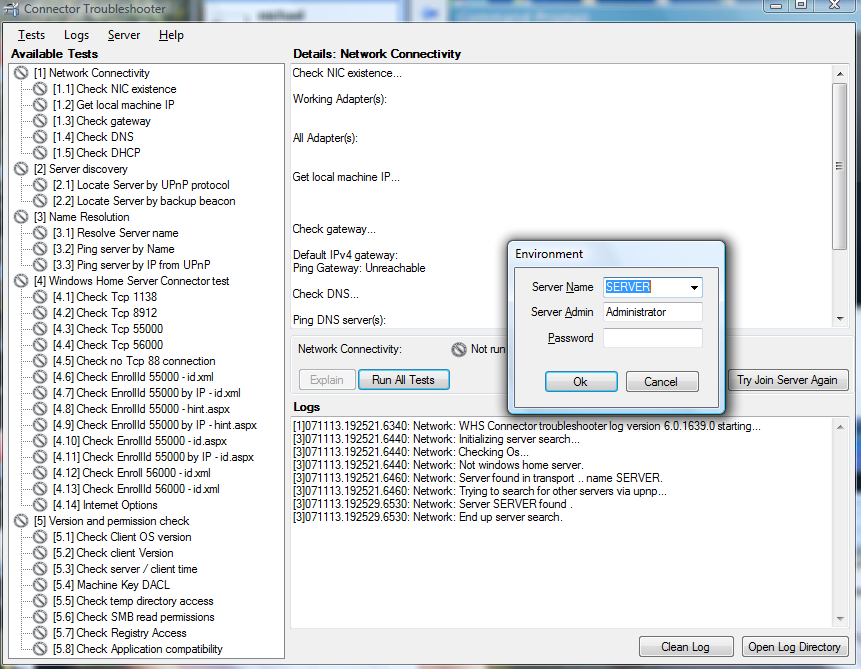
To start the advanced tests, we click Run all tests. The Troubleshooter asks you to select a server that you want to test, and then you must provide a user name and the Windows Home Server password. If your home server is not in the list, you can type its name. Type Administrator for the server admin name, and then type the Windows Home Server password for the password. The Windows Home Server password is the password that you created during Windows Home Server Setup. If you never created a Windows Home Server password, leave the password blank.
When the tests have finished you can click on any test within the left pane to see the results of that particular test in the top right pane or you can click on the Explain button to open the results in the web page as explained earlier.
The Try Join Server Again button can be useful if you have the connector software already installed and you have lost the connection between the client machine and the server by say reinstalling the server software or if you want to join your client machine to another Windows Home Server machine.
The other 2 remaining buttons are the Clean Log and Open Log Directory, which do what they state for the current machine.
Add-In
You also use the advanced mode of the Connector Troubleshooter to install the add-in, but before we do make sure to uninstall and delete any instances of toolkit.msi from the \\server\software\add-ins directory. Now, from within the Connector Troubleshooter click Server at the top left and then Publish Server Add-In. You will be prompted for the name of your home server and for a user-account name and password. Either you can use your own Windows Home Server user-account name and password, or you can use the Administrator user account and password that you used when you ran the Troubleshooter tests. The Troubleshooter automatically copies the Add-in to the \\ServerName\software\add-ins shared folder for you. So now, we need to use the Windows Home Server Console to install the Add-in via the Settings, Add-ins, Available tab and click Install beside “Windows Home Server Toolkit”. You will have to re log-on to the console
With this Add-in, you can now run the following troubleshooting tasks from within the Windows Home Server Console Settings page:
- Send log files from Windows Home Server to Microsoft to investigate problems.
- Check the health of your server storage.
- Open a command prompt on your home server.
- Open Event Viewer.
- View the Windows Home Server log files.
- Change the trace levels for the log files to record more or less information.
- Change the settings for the backup-health notification.
- And more….
The Windows Home Server Toolkit add-in can now be assessed from within the Console, Settings, Toolkit and is divided between 4 tabs. Remote, Storage, Backup and Support. Lets look at them in detail:
Remote Tab:

From here we can access our Remote Access History, which displays a calendar with the days highlighted when a user accessed the Server remotely. Displaying the users name, the time they logged on and the time they logged off.
Remote Desktop Troubleshooting allows you to Check RDP is enabled on the server as well as being allowed by Group Policy. Check Firewall makes sure that Windows Firewall is enabled on the server, exception and remote desktop is allowed by the Windows Firewall and that the remote desktop proxy port is also allowed by Windows Firewall.
Remote Access Website Configurations allows you to change the Remote Access Session Timeout. If you have large downloads and uploads that fail when using the web interface, then you will need to increase this value. The Remote Access Custom Error Mode can be turned on or off from here too.
The Website Health Status allows you to Check Websites which checks the RemoteAccess website, the PublicLanding website and the Welcome website incorporated into Windows Home Server. Check IIS Health checks to make sure that the IIS Windows Service is running, checks that AppPool is on and also checks that the default IIS website is Windows Home Server. Restart IIS restarts the IIS service on the Server.
Storage Tab:
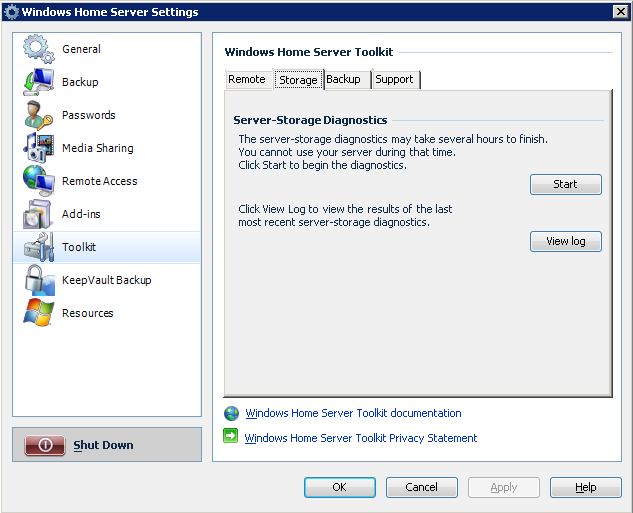
From the Storage tab we can Start the Server Storage Diagnostics to see how the storage sub system is operating on the Server. The reports generated do NOT have user-serviceable parts and take several hours to complete. There is no need to run this test unless asked by a support professional, in which case a View Log button is provided to view the details.
Backup Tab:
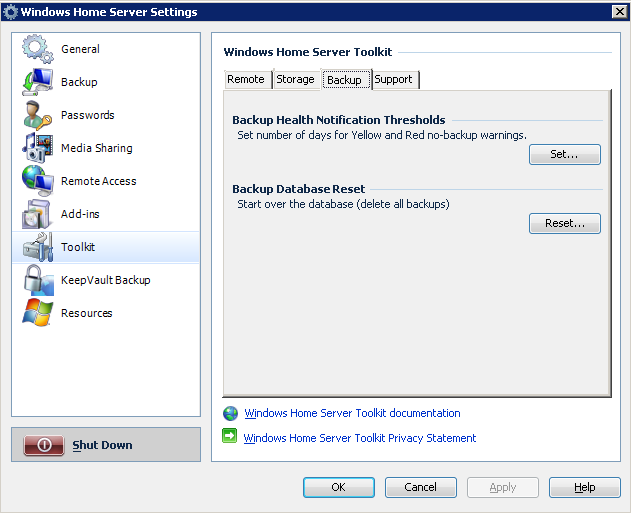
From here we can set the Backup Health Notification Thresholds, so you can adjust the set number of days that a Warning or Error message appears for each computer. Say your Son’s laptop which he brings over to you every two weeks or so would normally throw up an error message saying it has not been backed up on the 5th day onwards. From here you could set the message to appear from the 15th day onwards etc.
The Backup Database Reset option will reset the database by deleting all your backups. This could help you recover from a problem that might otherwise require a full re-install to correct. Be warned, you only get one warning message before deletion occurs.
Support Tab:
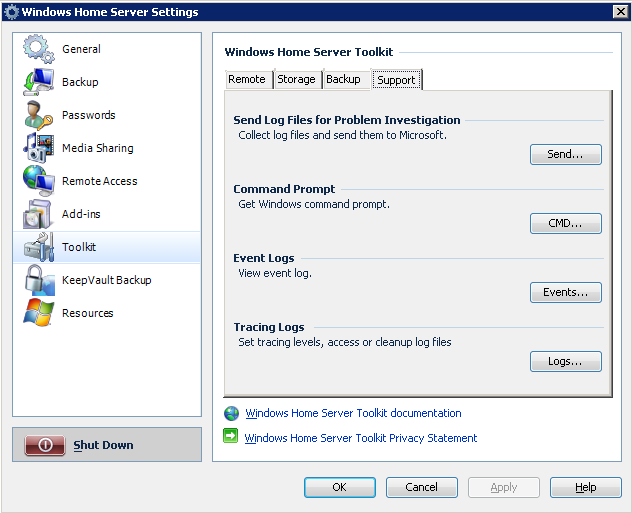
The final tab in the Toolkit a
dd-in is Support, and from here we can Send Log Files for Problem Investigation which is the same as what the Error Reporting command line utility does, which is to collect and send diagnostic data to Microsoft. It also gives us the cab number at the end to note down. This is only good for sending to Microsoft only and NOT other support personal as the cab and talq.zip file are NOT available within the User Profile folder afterwards as when using the Error Reporting command line utility. Command Prompt opens the CMD prompt on the Server for 30 minutes, after which time, it will be closed. Event Logs opens the event logs of the Server machine using Event Viewer. And finally Tracing Logs allows you to set different components within the server at different levels. Copying the log files to \\SERVER\Software\LogsCopy and the facility to delete old logs are also here.
Well there you have it, and hopefully you are more the wiser. For now,
Share this WHS Article with Others:


Can the administrator set up a Windows home server in such a way that he can see what I’ve been doing on my computer?
In other words, does the WHS allow for the administrator to view my history on website or view emails I’ve written?
If so, is there a way I can stop it?