Dynamic DNS (DDNS) or A backup for livenode.com
As you may know Microsoft temporary provides the yourhost.livenode.com sub domain to make it easy for you to establish a connection to your Windows Home Server remote access page (Web Interface) without needing to track the IP address. The method of keeping this easy to remember name linked to a changing (dynamic) IP address in real time is known as Dynamic DNS (DDNS) – Short for dynamic Domain Name System.
There have been occasions when livenode has been unavailable due to downtime or maintenance issues, so I wanted a backup sub domain address so I could access my server’s web interface when livenode.com was not available.
Luckily there are other providers that provide free Dynamic DNS, the most popular being No-IP.com and DynDNS.
Create Account
In this tutorial we shall use DynDNS as our example, so first we go here https://www.dyndns.com/account/create.html to sign up for an account.
Fill out your details and provide a valid e-mail address. Once you get the confirmation e-mail, you have 48 hours to activate your account. Once it’s activated, you can log into your account.
Once you’ve logged in, click on the My Services link in the top right corner of the DynDNS Web site. Next, click on Add Host Services to the right of Host Level Services. Then, finally click on Add Dynamic DNS Host. On this page you choose the name and the domain that you would like to use under Hostname. Leave the IP Address as it is, place a tick into Enable Wildcard and then things like www.yourhost.dyndns.org will work, leave the Mail Exchanger (optional) empty and finally click the Add Host Button.
Setup (a)
We now have two ways of setting this up. If your router supports DynDNS (DynDNS Certified Hardware Clients), then it is easy:
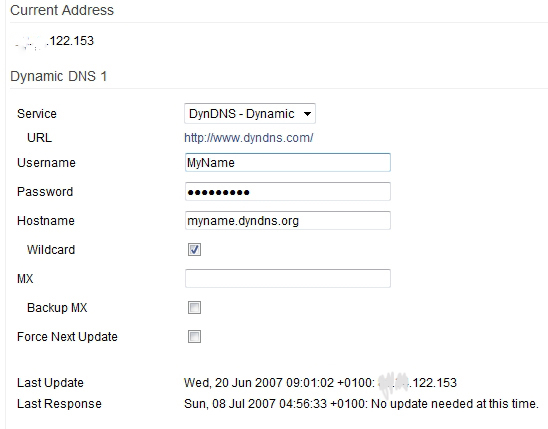
As you can see we just we access the configuration page for DDNS. In my router it’s under Basic then DDNS. Simply select DynDNS – Dynamic as the Service, type in the username and password that you set up with DynDNS.com, now type in the full hostname, such as yourhost.dyndns.org. We tick the Wildcard box and click the Save Settings button. As you can see the current IP address is shown at the top of the image under Current Address. The object here is to have your router update your hostname’s DNS entry at DynDNS with your public IP address whenever it changes.
Setup (b)
If your router does not support DynDNS then we can install the DynDNS software on the Windows Home Server. This software run in the background (or periodically), and ensures that the IP in the DynDNS database is the same as the one you are currently using so that your hostname remains accessible when you are online.
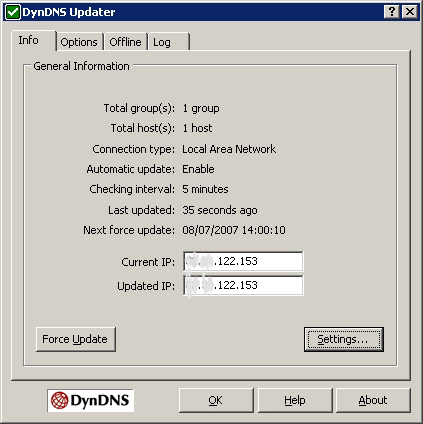
Just make sure that when you install you click that you want it to install as a service, so it will work when nobody is logged in the WHS.
Forwarding Ports
If you have not done so already you will need to configure your router to forward the ports to your home server machine.
Finishing Off
Make sure that your WHS is configured for remote access (console, settings, Remote Access, Web Site Connectivity) and for security issues make sure that you use complex passwords. You can now access your WHS with Internet Explorer (since Remote Desktop is an ActiveX) using https://yourhost.dyndns.org. You will get a certificate error warning, but this is normal as the new DynDNS sub domain address will not be listed in the certificate.
NOTE: Once WHS is released (RTM) the livenode.com sub domain will change to yourhost.homeserver.com.
Share this WHS Article with Others:


Nice Info, Philip.
I’ve been using DynDNS as a backup to livenode since WHS Beta 2 and have promoted doing so on the WHS forums. Basically you can have two URL’s to your WHS box if needed. Live node has gone down before… 😉
I have to say, that I could not agree with you in 100%, but that’s just my IMHO, which could be very wrong.
p.s. You have a very good template . Where did you find it?